
Transfer Photos from a Ricoh GR II, III, IIIx or IV to iPhone
On this page
You can transfer Ricoh GR photos to an iPhone over the camera’s Wi-Fi, with an SD card reader, or through a compatible USB connection. Use an app for a few photos on the go, or a reader for a large batch.
The quick answer
- Free and official: Image Sync (GR II / III / IIIx) or GR World (GR III / IIIx / IV, transfer only on GR II), whichever matches your camera.
- A handful of photos over Wi-Fi: the official app for your model, over Wi-Fi.
- A full card, or a lot of RAW and video: an SD card reader. No pairing, no waiting on a spinning Wi-Fi icon.
- An independent app: GR Snap (ours, paid), or one of the others in the app comparison.
Method 1: Ricoh Image Sync (official, free)
Image Sync supports the GR II, GR III, and GR IIIx. It does not support the GR IV.
-
On the camera, turn on Bluetooth: on the GR III / IIIx open Bluetooth Setting in the E6 menu and set Action Mode to On anytime or On when power is on. The GR II has no Bluetooth; turn on its wireless LAN instead.
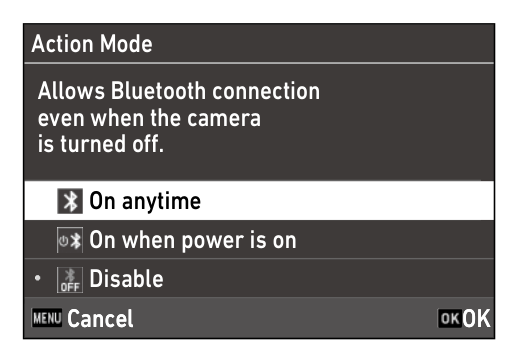
From the Ricoh GR III operating manual -
Open Image Sync and select your camera.
-
Confirm the iOS prompt to join the camera’s Wi-Fi network (on GR II, join the network manually in iOS Settings first).
-
Allow the Bluetooth, Local Network, and Photos permissions when iOS asks; each is granted per app.
-
Browse the camera’s photo library inside the app and download what you need.
If pairing or Wi-Fi keeps failing, see Image Sync Not Connecting? 8 Fixes for Ricoh GR Cameras.
Method 2: Ricoh GR World (official, free)
GR World transfers photos from GR II / III / IIIx / IV, but the connection steps differ. Ricoh’s FAQ requires firmware 2.00 or later for GR III / HDF, 1.50 for GR IIIx / HDF and 1.10 for GR II.
-
Enable wireless communication on the camera: use Bluetooth Setting → Action Mode on GR III / IIIx, or Wireless Communication → Action Mode on GR IV. For a first-time connection, choose Pairing on the camera and first-time setup in GR World. If already paired, choose the previously-connected setup in the app without putting the camera into Pairing mode.
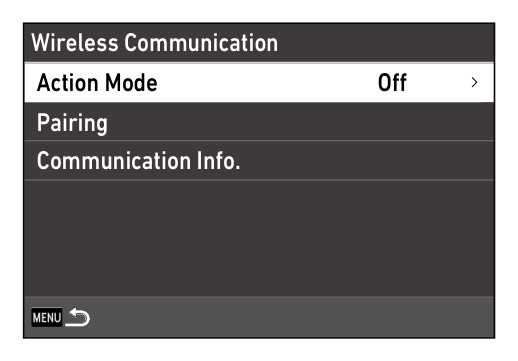
From the Ricoh GR IV operating manual -
On GR III / IIIx, enter the authentication code shown on the camera when the app requests it. On GR IV, check that the codes match and approve pairing on the camera and iPhone. Allow Bluetooth and location access as instructed by the app.
-
Open image import, confirm the iPhone’s Wi-Fi join prompt and allow Local Network and Photos access.
-
Select the pictures and import them. Keep GR World open during the transfer: on iOS, going into the background can interrupt it after about a minute.
GR II: it has no Bluetooth. Enable the camera’s Wi-Fi, read its network name and password from the camera’s Wi-Fi settings, join that network in iPhone Settings, then return to GR World.
If the app cannot find the camera, follow GR World connection troubleshooting.
Method 3: SD card reader or USB-C cable
GR IV uses a microSD card; use a compatible reader or an SD adapter. GR II, III and IIIx use full-size SD cards.
For a large batch of DNG or MOV files, a card reader avoids the wireless connection entirely. Choose a reader that matches the iPhone or iPad port: USB-C or Lightning.
- Turn the camera off, remove the SD card and place it in the reader.
- Connect the reader to the iPhone or iPad and open Photos.
- Open the connected device’s import view. Its location differs by iOS version; follow Apple’s current import instructions if it does not appear automatically.
- Select the files and import them. Wait for completion before disconnecting the reader and returning the card to the camera.
Direct USB is a separate option: with a compatible camera, data cable and adapter, connect the camera in its supported USB transfer mode instead of removing the card. Check the camera manual for that mode and whether it exposes the SD card or internal memory. A charging cable alone does not guarantee data transfer; a Lightning iPhone may require a camera adapter. Then use the connected-device import view in Photos.
Method 4: Independent apps
GR Snap is our paid app. It transfers JPEG, DNG and MOV from the GR II / III / IIIx / IV, keeps the downloaded photos browsable in its Library after the camera disconnects, and saves a RAW+JPEG pair as one asset in Apple Photos.
- On the GR III / IIIx / IV, turn on Bluetooth in the camera menu (see Method 2 for the menu path) and pair the camera in GR Snap. Confirm the iOS Wi-Fi join prompt when it appears.
- On GR II, enable Wi-Fi on the camera and join its network manually in iPhone Settings before opening GR Snap. This model has no Bluetooth wake or remote control in the app.
- Choose individual photos or a batch and start the download. Check queue progress before disconnecting the camera.
- Open the downloaded photos in Library to browse and share without the camera connection.
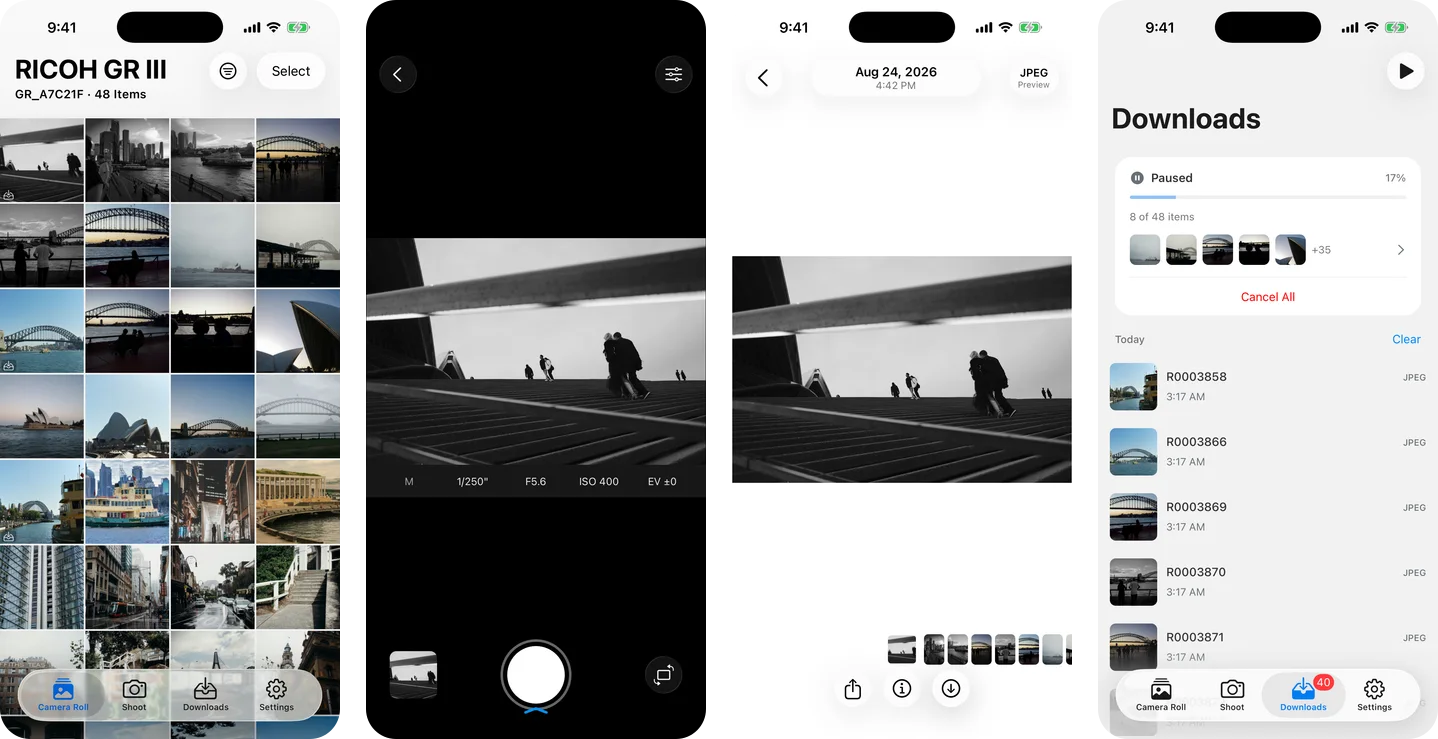
GR Snap can record a route while you shoot and add missing photo locations after transfer. See Geotagging in GR Snap.
GR Linker and the other independent apps are compared in the Ricoh GR app comparison.
Transferring from a GR IV: when the download sits at 0%
If a GR IV download stays at 0%, first leave the transferring app open with the screen awake, confirm the iPhone is still connected to the camera’s Wi-Fi, and check free storage and the app’s permissions. A stalled percentage alone does not identify the cause.
Ricoh documents an iOS background limit for GR World: transfer can stop about a minute after the app enters the background. Camera firmware, iOS version and network configuration can also affect the result.
If the connection keeps changing networks, trying Airplane Mode with Wi-Fi re-enabled can help isolate the network condition, but it is not a guaranteed fix. For repeatable troubleshooting, note the camera firmware, iOS version, app and whether the stall happens in the foreground. For a large batch, use a card reader. See GR World connection fixes for that app’s setup checks.
RAW (DNG) and MOV: what actually transfers
- JPEG: choose original quality when you want the camera’s full-resolution image rather than a resized preview.
- DNG / RAW+JPEG: confirm the app’s selected download format. GR Snap saves a RAW+JPEG pair as one asset in Apple Photos; that pairing is an app/import behavior, not a property of the card reader.
- MOV: check the particular app and camera combination. GR Snap supports video transfer, but large files take longer and an interrupted file may need to restart. Use a card reader when wireless transfers are impractical.
Before a large import, check Settings → General → iPhone Storage. The camera Wi-Fi having no internet access is normal: files travel locally between camera and phone.
Add a frame or shooting details with Share Styles
Share Styles adds a frame, camera model or shooting details to a copy of your photo. Your original stays unchanged. RAW-only files and videos are shared without a style.
See Share Styles in GR Snap for choosing and saving a style.
Common pitfalls
- VPN swallowing the connection. The camera’s Wi-Fi has no route to the internet; an always-on VPN profile routes requests into its tunnel and lets them time out instead. Turn it off while transferring.
- Missing permissions. Check Bluetooth, Local Network and Photos access in Settings → Privacy & Security. These permissions affect different steps: finding the camera, reading its files and saving photos.
- Low storage killing a batch download. Check Settings, then General, then iPhone Storage before pulling a full card of RAW or video.
- A dropped Wi-Fi link losing progress. Interrupted wireless transfers restart the affected file instead of resuming it, so keep the phone close to the camera and awake during large batches.
If the wireless handshake itself is the problem, rather than the transfer, the app-specific checklists go into more detail: Image Sync Not Connecting? and GR World Not Connecting?